 Your Position:
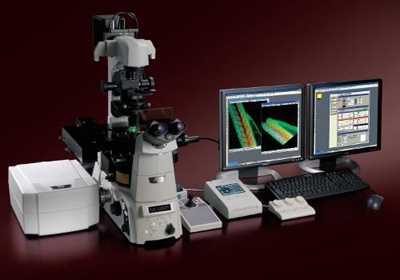
Nikon C1SI Laser Scanning Confocal Microscope

The instrument can be achieved combining conventional fluorescence imaging and spectral imaging confocal fast. Equipped with conventional fluorescence detectors and spectral detectors meet the application requirements of a variety of scientific fields. 320nm single sweep bandwidth can be obtained a spectral image, the wavelength resolution can be 2.5, 5 and 10nm, 10nm selected resolution, and the single scan is obtained in the wavelength range 320nm. Main features:
FRAP observation
Temporal dynamics of spectral image recording
Spectral fluorescence signal split to eliminate cross-color
Through efficient fluorescence technique
High wavelength resolution
Control technologies using polarized spectral detector
Captured the true fluorescent colors
On living cells and the tissue to minimize the
While shooting 32-channel spectral image
Dual integrated signal processing
Nikon C1SI confocal laser scanning microscopy procedures
First, booting
1. Open the UPS, patch panel power switch
2. According to the third portion shown open to use the laser, the laser cannot be used without opening it.
3. Open the upper right corner of confocal controller switch control panel
4. In order to open the computer, power fluorescent microscope, and click on the halogen power switch
5. Open the right rear end of the HUB microscope base control unit power
6. The controller turns the confirmation of the state of focus, EZ-C1. Double click the shortcut icon on the software option to start the focusing operation.
7. To obtain images, microscopic examination - will be converted to laser excitation microscopy acquisition mode - set the relevant parameters in the software - scan to obtain images - adjust parameters - to obtain the best image and save it.
Second, shut down
1. Turn off the software, and then close the confocal controller (Please note)
2. And close each control part that powers the microscope
3. Please tell us by the third party, after the close of each laser; close the front panel of the total laser power supply switch cabinet
4. Wait for the 488 laser cooling fan to stop(fan stops, about 3-5min); turn off the master switch wiring board.
5. The end of the experiment: Fill out and sign the registration test, clean the lens and keep it clean.
Third, the order of the laser switch
To open the first base side of the laser power switch, and then open the corresponding laser as needed.
1,405 nm/640nm laser power control panel
Power: the power switch to the ON position - key switch to the I position
Shutdown: key switch is the O position - power switch by clicking on the OFF button
2,543 nm laser power
Power: The power switch to the I position
Off: The power switch is the O position
3,488 nm laser power (please note)
Power: the power switch of the ON position on 3a, - key switch 3a to a horizontal position on the - 3b left of the first switch into the ON position, then the fan starts to rotate - about 30sec after, there will be a digital LCD panel display about 17 - the left side of the second switch from the standby 3b appropriated run, the LCD panel displays the value of about 40, open to complete.
Shutdown: The second switch from the left side 3b run appropriated standby - 3b left of the first switch into the OFF position - on the key switch 3a to a vertical position - wait a few minutes until the fans stop after the rotation, the power switch is the OFF position.
Fourth, pay attention to:
1. The boot must be first open hardware (including microscopes, lasers, confocal total controller), and then open the NIS-Elements software; shutdown, turn off the software, then turn off the hardware.
2. Multi-line Ar ion laser power is higher, follow the steps for switching off, which mayshorten the life of thelaser, and may cause damage to the laser.
-
Marks Required for MBBS in China
-
Dr. Van C.Kelley From Nanke Datta State University Visited HBNU
-
Elizabeth Drake
-
Hebei North University Olympic Stadium
-
The International Education Exchange Center Held Series of Activities to Help Bid for the Olympics
-
What're The Application Requirements For Studying English-Taught MBBS In China?


