 Your Position:
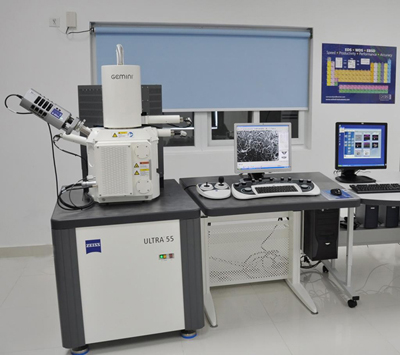
HITACHI S-3400N Scanning Electron Microscope

It has a newly developed electro-optical systems, with more automation features, the most important are combined with automatic axis function, which is the other similar electron microscope functions are not available. Including automatic beam settings automatically co-axial shafts. Also has a low accelerating voltage when 3kV ensure 10nm resolution, real-time display of two images, real-time full-screen images, and other features.
Scanning electron microscopy procedures
1. Open the UPS power supply (see UPS procedures).
2. Open the scanning electron microscope with a key switch, twist from the OFF position to the START file, the key to ON automatically playing files, the computer automatically turned into a workstation, the instrument automatically vacuum.
3. The body EVAC vacuum indicator flashes description does not meet the requirements, N-MODE flash refers to the sample chamber their air, PUMP flash illustrate molecular pump is started.
4. Until EVAC lights are not flashing, N-MODE lights off, PUMP lights are not flashing, indicating that the vacuum degree requirements have been met.
5. The sample check operation lever T, Z, X, Y position adjustment Rev. coincide with the predetermined position (T-0, Z-35, X-30, Y-20)
6. Long press the fuselage AIR key, the sample chamber relief, pending the instrument sounds three drops of sound, the relief is completed.
7. The sample (For spraying, the operator see ion sputtering) is firmly fixed in the sample holder, measuring the height of the sample feet shorter than the height of 2mm.
8. Wear gloves, the sample completely out of the door gently, a number of good height samples, carefully put in the whole completely mobile platform.
9. The Z-axis rotation of the sample station rose to the highest position of the sample stage height is lower than the observed protective foot height, foot protection if higher, the sample stage should be pulled out, check the above steps correctly, it should be handled as specified above, otherwise serious consequences will occur.
10. Light off the sample door, light hand help, according to the fuselage EVAC key instrument vacuum.
11. The vacuum required to achieve, double workstation VaCC black areas, pop-up dialog box, set the accelerating voltage, working distance, the probe current, working distance should correspond with the Z value.
12. Adjusting X, Y-axis to find the area of interest, adjusting the operating table MAGNIFICAT / ON Select the appropriate magnification and adjust the COARSE and FINE knob Focus on the specimen, adjust STIGMA ----- ALIGNMENT eliminate astigmatism, are more mechanical coarse.
13. Click on the workstation Align key to bringing up the dialog box, select the Aperture Align diaphragm alignment, adjust STIGMA / ALIGNMENT multifunction button until the image does not move, select Stigma Align. X, the X direction eliminates astigmatism, select Stigma Align. Y to eliminate astigmatism Y direction, but also via the multifunction buttons, beating concentric raised image above operations are carried out in more than 5000 times, after a good tune, click the OFF button to close the dialog box.
14. Select Red 1 mode image in focus, click on the image transferred to the satisfaction of 1280, take pictures, save to your computer, the picture is taken.
15. Double-click on the black area VaCC OFF button off pressure, regulate T, Z, X, Y knobs required homing.
16. After the sample chamber by Air key relief, heard three "beep" sound, the sample has carefully opened the door, remove the sample, the sample doors closed fuselage EVAC key instrument vacuum.
17. After a good vacuum pumping, twist the key files from ON to OFF position, the instrument off.
18. Closed electron microscopy open space.
19. Closed UPS.
-
Third Session Foreign Language Cultural Activities Month
-
Hebei North University First Clinical Medical College Carried Out Voluntary Service Activities
-
Liu Yan, President Of China Institute Of Sports Law, Invited To Our School For Academic Report
-
Batch 2012
-
American MD Company Spectra Max M2E Microplate
-
Fast Track For China MBBS Application


